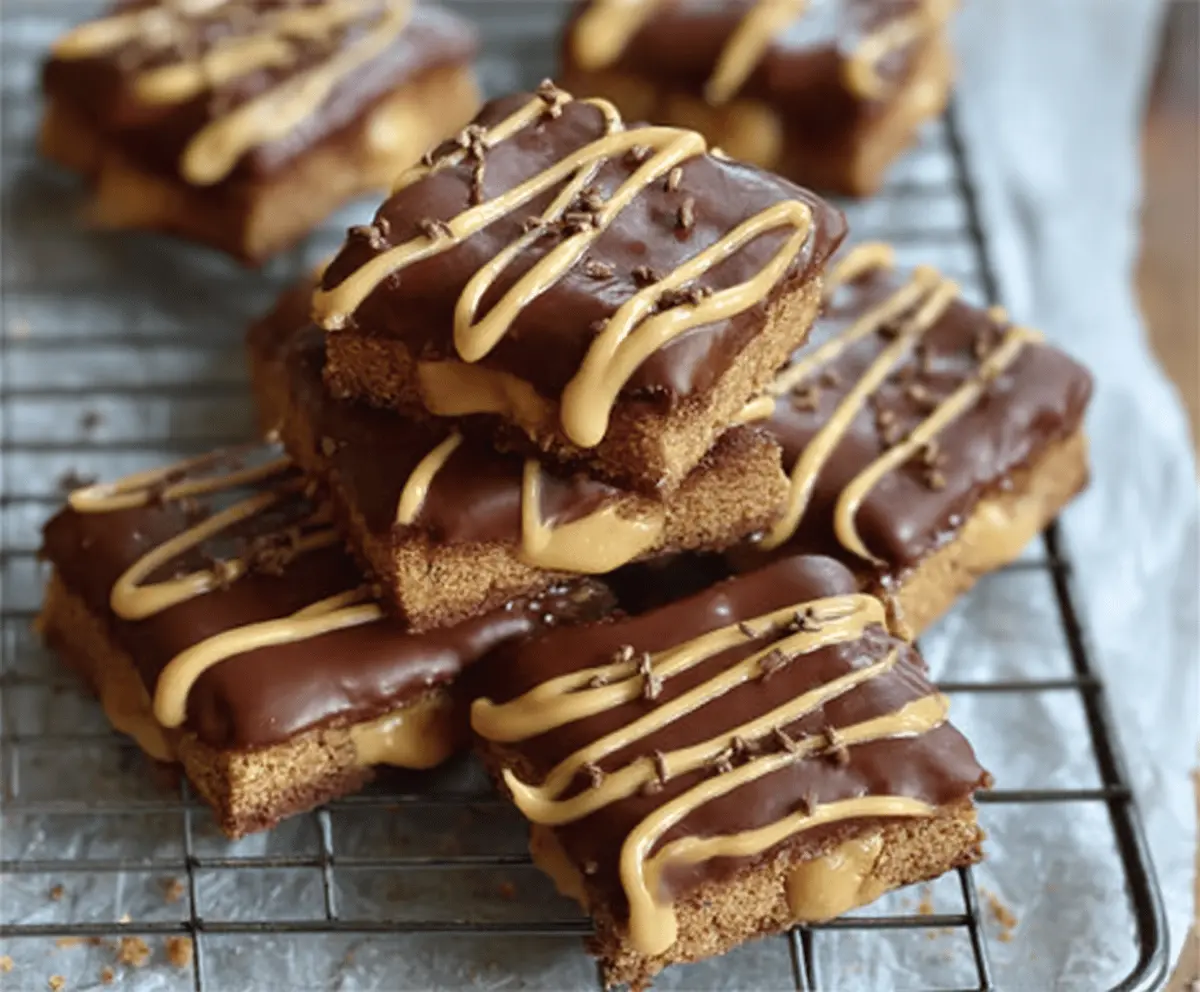
No bake buckeye graham crackers are a fun and easy treat that combines the classic flavors of peanut butter, chocolate, and a bit of crunch from graham crackers. The best part is that you don’t have to fire up the oven to make them – just simple steps and a little waiting time for the chocolate to set. These little bites remind me of that perfect mix of sweet and salty that always hits the spot.
I love making these when I want something sweet but don’t want to spend too much time in the kitchen. The graham crackers give a nice crispy base that pairs so well with the creamy peanut butter filling and rich chocolate on top. One helpful tip I always use is to chill the peanut butter layer before adding the chocolate – it makes everything easier to handle and keeps the shapes nice and neat.
These buckeye graham crackers are perfect for sharing at holiday parties, as a simple after-school snack, or even as a little treat when you just need something to lift your mood. I often find myself sneaking a couple during the making process – they’re that addictive! If you’re looking for a quick yet delicious homemade snack, these are a great choice to keep in your dessert rotation.
Key Ingredients & Substitutions
Graham Crackers: The crunchy base for this treat. You can swap them for digestive biscuits or any crunchy cookie if graham crackers aren’t available.
Peanut Butter: Creamy peanut butter works best here for a smooth filling. If you want a nut-free option, try sunflower seed butter instead.
Butter: Use unsalted and softened to blend easily. For a dairy-free version, use coconut oil or vegan butter.
Powdered Sugar: This sweetens and thickens the filling. You could try icing sugar or a bit of maple syrup with cornstarch as a binder if you prefer less processed sugar.
Chocolate Chips: Semi-sweet chips melt nicely for coating. Dark chocolate or milk chocolate are great alternatives depending on taste.
How Do I Get the Peanut Butter Filling Just Right Without It Being Too Soft or Hard?
The key is balancing the peanut butter, butter, and powdered sugar for a creamy yet firm filling. Here’s what works well:
- Make sure your butter is softened but not melted to keep the texture smooth.
- Beat the butter and peanut butter together until really creamy before adding powdered sugar.
- Add powdered sugar gradually and mix until you get a thick spreadable consistency.
- Chill the filled graham cracker sandwiches before dipping in chocolate to firm the filling and prevent mess.
This approach keeps the filling soft enough to enjoy but stable when held or dipped in chocolate.
Equipment You’ll Need
- Baking sheet – perfect for holding your graham cracker sandwiches as you assemble and chill them.
- Parchment paper – keeps everything from sticking and makes cleanup easy.
- Mixing bowl – for blending the peanut butter filling smoothly.
- Electric mixer or sturdy spoon – helps combine the filling ingredients until creamy.
- Microwave-safe bowl – for melting the chocolate chips safely and evenly.
- Fork or dipping tool – to dip each sandwich into the chocolate without making a mess.
Flavor Variations & Add-Ins
- Swap peanut butter for almond or cashew butter for a nutty twist and different flavor profile.
- Add a pinch of sea salt on top before chocolate sets to balance sweetness with a salty crunch.
- Mix mini chocolate chips or chopped nuts into the peanut butter filling for extra texture.
- Use white chocolate instead of semi-sweet for a sweeter, creamier coating.
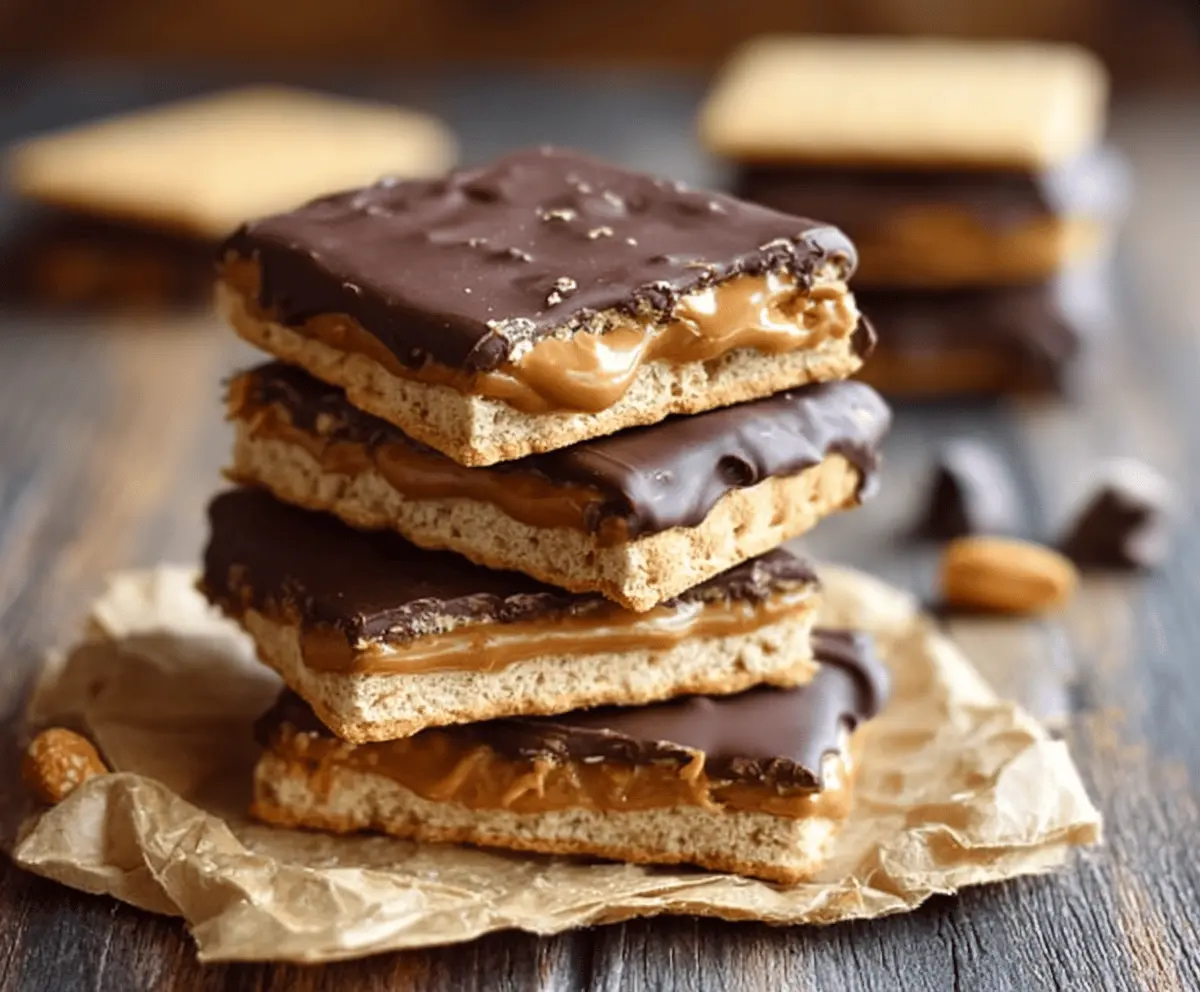
No Bake Buckeye Graham Crackers
Ingredients You’ll Need:
For The Graham Cracker Sandwiches:
- 16 graham cracker squares
- 1 cup creamy peanut butter
- 1/2 cup unsalted butter, softened
- 1 1/2 cups powdered sugar
- 1 teaspoon vanilla extract
For The Chocolate Coating:
- 2 cups semi-sweet chocolate chips
- 1 tablespoon coconut oil or vegetable oil (optional, for smoother chocolate)
How Much Time Will You Need?
This recipe takes about 15 minutes to prepare and assemble. Then, you’ll need about 15 minutes to chill the sandwiches in the freezer before dipping them in chocolate. Lastly, allow around 30 minutes for the chocolate to set in the refrigerator. Overall, around 1 hour from start to finish.
Step-by-Step Instructions:
1. Assemble the Graham Cracker Sandwiches:
Start by lining a baking sheet with parchment paper. Place half of the graham crackers on the sheet. In a mixing bowl, beat the softened butter, creamy peanut butter, powdered sugar, and vanilla extract together until smooth and creamy. Spread this peanut butter mixture evenly over the graham crackers on the baking sheet. Then, gently place the remaining graham crackers on top to create sandwiches. Press lightly so they stick together.
2. Chill the Sandwiches:
Put the assembled sandwiches into the freezer for 10-15 minutes. This step helps firm up the peanut butter layer, making it easier to dip in chocolate without losing shape.
3. Dip in Chocolate:
While the sandwiches chill, melt your chocolate chips with coconut or vegetable oil in a microwave-safe bowl. Heat in 30-second bursts, stirring after each, until the chocolate is smooth. Remove sandwiches from the freezer, and using a fork or dipping tool, dip each sandwich into the melted chocolate, coating the top and sides. Let the extra chocolate drip off before placing them back on the parchment paper.
4. Set and Serve:
Place the chocolate-coated sandwiches in the refrigerator for about 30 minutes, or until chocolate is fully set. Once ready, enjoy! Keep any leftovers in an airtight container in the fridge.
Can I Use Natural Peanut Butter for This Recipe?
Yes, you can! Just keep in mind natural peanut butter is thinner and may make the filling a bit softer. You might want to add a little extra powdered sugar to help it firm up.
How Should I Store Leftover Buckeye Graham Crackers?
Store them in an airtight container in the refrigerator for up to one week. This keeps the chocolate coating firm and the peanut butter filling fresh.
Can I Make These Ahead of Time?
Absolutely! Prepare the sandwiches and dip them in chocolate, then keep them refrigerated until you’re ready to serve. They actually taste great chilled.
What If I Don’t Have Coconut or Vegetable Oil for Melting Chocolate?
It’s okay to melt chocolate without oil, but adding a tablespoon helps keep the coating smooth and glossy. If you don’t have oil, melt the chocolate gently in short bursts and stir frequently to avoid burning.